Select Primary
or Secondary Carrier
Enter 'P' if
your office wants to bill the primary or “S” if the secondary insurance
carrier.
Do you wish to
reselect claims?
If this is a
reselection of insurance claims already transmitted enter 'Y'; otherwise, enter
'N'.
Note: If this
is a reselect it will only transmit insurance forms for all of those services
already marked or flagged by the system as having been billed.
Only Unpaid
Services
This field
will be disregarded by the system if you “N’ to reselect, if you entered “Y”
then you will be allowed access to this field. This option will only be
available for those practices using the line item posting function of the
program. By answering "Y", the system will only transmit claims for
those services, which have not been flagged as completed. Please refer to the
section of the manual entitled "Transaction Management", specifically
how to enter payments, for more information on how to mark services completed
or incomplete.
Print an
HCFA-1500 for each Claim.
In the event
that your office wants to print an AMA (HCFA-1500) form for all those claims
selected for electronic transmission enter "Y" in this field. The
claims will print with the wording electronically transmitted on it. Otherwise,
if your office does not like to maintain individual paper claims for all those
services submitted electronically, since after all, the entire claim
information is stored by the system, reply "N" to this field. This
is an option that you can decide to use in your system depending on the
convenience of your practice.
Once you are
content with the information that you have entered here, click on the OK button
on this screen, or cancel in you do not want to continue with this transaction.
Once you click on OK the system will commence preparing the report. You
will see a window pop up and progressively see the report reach 100%. You
have a button that gives you the option to print what you have selected. “Transmission
Edit List” later explained in this chapter.
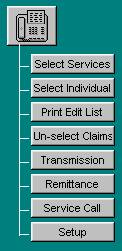
II. Select Individual
Using your mouse click
on the button that reads “Select Individual” from the Online Process column in
the
program. The system will
bring up a screen asking for Patient Id# and Sequence #.
Patient Id
Enter here the patient
id number, for the patient that you wish to transmit an individual claim for.
If you do not know the patient Id number, go through the method previously
explained in this manual.
Sequence #
Enter here the sequence
number of the service that you wish to transmit a claim for, If you do not the
sequence number using the step previously described in this manual find the
sequence number you need.
Once this information is
entered click on the okay button on this window and the claim will be selected.
It will now show up on your Transmission Edit List and will be ready to
transmit.
Un-select
Claims

Figure
F.2
III. Print
Transmission Edit List
To access this
function, click on the button that reads “Print Edit List” in the Online
Process column of the program. The system will bring up a window that will ask
you if you want to print this list Alphabetically, make your choice and click
on the OK button. This system will then bring up a preview of the report on
your screen, you can review it from here. If you want to print this report,
there is a tool bar located on the top part of the screen that you click on in
order to print the Transmission Edit List. If you want to close this there is
also a button on the tool bar to close the preview.
The following
is a list on Error Messages that can appear on your Transmission Edit list.
These Errors and there meanings are explained below.
Error Messages
Inv. HIC : This error
message means that the patient's Medicare Insurance number is incorrect. It
could be that there are digits missing from the number, or the letter at the
end of the number is missing. Also if you use the hyphens to separate the
numbers the system will not accept that entry due to Medicare regulations.
Inv. Sex: This means
that the letter of the patient sex in the patient's demographic record is
incorrect or it does not contain a letter.
Inv. Name: The invalid
name message means that either the patients name is incomplete or there is an
unacceptable character in the patient's name. When entering the patients name
in the demographics screen you cannot use any periods (.), commas (,), hyphens
(-), only letters. For example, if the name of the patient is "John Smith
Jr." enter
John Smith Jr
Notice that
there is no period after the "JR". Another example, if the patients
name is "CHRIS EVERT-LLOYD" you cannot use a hyphen. Your entry
should be the following
ENTRY: CHRIS
EVERT LLOYD
Inv. Address: The system
will not accept special character in the address field. For example, if you
have an address with an apartment number do not enter the number sign
"#" and the apartment number, just limit yourself to entering the
apartment number. Do not use periods (.), or commas (,), or anything other
than letters and numbers.
Inv. City: This field
works the same as the address field you cannot have any special characters.
The only exception is the comma (,) after the city. The format of the address
entry on the patients record should be the following:
MIAMI, FL
33124
WINTER HAVEN,
TX 45278 etc......
Note: It is
of extreme importance that you enter the (,) after the city, as said serves to
denote within the Medicare city, which is the patient's city, verse the state.
Also note that when entering the state it consists exclusively of the postal
two-character code set. Do not use abbreviations, such as: FLA for Florida.
Inv. State: In the area
for the state you can only enter the two-letter abbreviation for the state of
the patient. The system will not accept points after the state. For example:
FL. -- Incorrect
FL -- Correct
Inv. zip: The system
will only accept five digits on the area for the Zip Code. There must be no
special characters, only the five-digit number of the patients Zip Code. For
Example:
33456
Inv. UPIN: The system
will display invalid UPIN if the claim does not contain a valid UPIN number.
The UPIN number is stored in the physician codes file, refer to the section of
the manual entitled "File Maintenance". Also verify that the service
screen contains a physician code.
Inv. Assg.: If the
assignment question is not answered on the service entry screen to be either
"Y" or "N", the system will not accept this claim for
transmission. Given that you are including no instructions as to the form of
payment your office will accept, for the services rendered.
The service
screen is always defaulted to an assignment, in the case that you blank the
field out, for any reason, and the system detects said to be blank for a
particular service transaction is when you will see this error message.
Inv. Sign.: In the
"Additional Patient Information" file that is located in the Patient
Management section of the manual the questions of Approval #1, #2, must have
the letter , “A” which signifies that the patient’s signature is on file.
Every patient account will be defaulted to the letter "A", but in the
case that you change this information the system will not accept the claims,
for electronic transmission. For more detailed information about the
"Additional Patient Information" file, refer to the Patient
Management section of this manual.
Inv. Total: The system
will not accept any claims submitted for a total amount of "0". If
you have entered any services and have posted a charge of "0" amount,
the system will not accept the claim for electronic transmission.
Inv. Proc.: If you have
entered a CPT Number which does not match the standard five digit code
verification into one of your internal procedure system codes, the system will
not accept the claim. All CPT#'s must be five digits long. The system will
only verify that it is five digits long, but it cannot verify that it is the
proper procedure code number.
Inv. Amt: When you get
this error, it means that one of the procedures entered to the claim being
selected carries a value of 0.00. That is, the entire claim may have a face
value of $356.00, which is the result of 4 procedures rendered, but one or
several of the 4 procedures rendered carry a value of 0.00. This is
unacceptable, and the claim should be re-entered properly, as otherwise, it
would be automatically discarded by the Medicare system.
Inv. LOS: This stands
for invalid Location of Service. If when entering a service you leave blank
the Location of Service; otherwise known as the place of service, the system
will advise you when you attempt to transmit the claim. Refer to the
Transaction Management section of this manual for further reference on how to
specify the proper place of service.
Inv. Phys.: If you have
not entered a physician code when entering the service, then the system will
advise you that the claim has an "Inv. Phys."
Inv. No. of
trts: When entering a service if you incorrectly entered into the system
that the number of treatments is "0" then the system will advise you
that the number of treatments are invalid. Number of treatments is entered
through the amount field of the service entry where you may specify 2S, or .5S,
etc...
Inv. PRO #: If the
Prior authorization number that you have entered while entering the service has
an incorrect format, from that expected by Medicare, the system will advise you
of it.
This was a list
of all the possible error messages that could appear when doing a "Transmission Edit List". The error messages and requirements hereby
set forth are based on Medicare requirements and idiosyncracies. The reason
for this report is to make sure that your claims are filed in accordance to
Medicare standards, such that they do not discard your claims for following
improper format or missing required information.
If when you
print your "Transmission Edit List", the list displays no error
messages, you may then transmit the data to the host computer. To execute this
function simply select "Transmit Data to Host Computer". The system
will now prepare the data for transmission and then send it to the host
computer, which awaits the arrival of the claims.
To transmit
data to host computer select "Transmit data to host computer" form
the "On-line transmission processing" menu. The system will now
prepare the modem for transmission and submit the data to the host computer.
In the case
that you have some errors on the Edit list then your first step must be to
correct these errors, prior to transmitting the claims electronically. Some
errors you may fix by simply retrieving the entry that you made; others require
that you delete the original entry and re-enter with the corrected
information.
When you print
the "Transmission Edit List", it contains the sequence numbers
associated to the claims selected for electronic transmission. When you need
to fix any information on a claim, whether it is re-entering the service or
just modifying the already entered information, you must first remove this
claim from your list of selected claims. To remove a claim from the selected
list of claims choose;
IV. Un-Select Claims
From the
On-line processing menu, click on the button that reads “Un-select Claims”.
The system will now prompt you for the sequence number of the claim to delete.
Enter here the appropriate sequence number for the claim that you wish to
un-select. You can find this number on your edit list. If you want to
Un-select All claims in this field type in <ALL>. Once you have entered
this information, click on the field that says patient, when you do this the
system will bring up how many claims you un-selected and the amount. If this is
what you want to delete, click on the DELETE button on this window and the
claims will be unselected. If you no longer wish to un-select these claims
instead of click on OK click on the EXIT button and the system will bring you
back to the main menu of the program. Once you have un-selected now you can
correct the claim. Here is a list of the errors and what steps you must follow
to correct them.
Errors that
need to be erased or deleted, in order to re-enter them, correctly.
Inv. Total
Inv. Proc.
Inv. Amount
Inv. No. of
trts.
Inv. PRO #
For these
error messages you need to erase or delete the already entered service record
and re-enter it with the correct information.
Error messages
that need Editing not re-entering
Inv. Upin
Inv. HIC
Inv. Sex
Inv. Name
Inv. Address
Inv. City
Inv. State
Inv. Zip
Inv. Assg
Inv. Sign.
Inv. LOS
Inv. Phys.
Inv. Diag.
Remember to
correct a claim you must first Un-select the claim from the Transmission Edit
list. Now you must either re-enter the claim or do the proper editing.
Once you have
finished editing or re-entering the incorrect claims you must add these claims
back to your Transmission Edit list. To place these claims back on the edit
list you must select the "Select data for transmission" function of
the on-line transmission processing section of the system. When you are going
to select you only need to select the claims that you have corrected. For
information on how to select go to the beginning of the on-line transmission
processing. Once you are done selecting and have added the claims to your list
again, you should print another "Transmission Edit list", for
verification. At this point if there are still error messages on your list,
then you need to repeat the above procedure. If at this time there are no
error messages then your next step is to transmit the information to the host
computer.
Note: When
selecting the claims corrected, not the ones deleted and re-entered, remember
that said were already marked by the system, while editing, as having been
billed or selected. Therefore, on the prompt that asks if this is a resubmission,
you must reply 'Y'. Otherwise, the system will never select said claims.
If you had
errors that required both, simply editing, or deleting and re-entering of
services, you will find yourself doing two-selection process for the specific
claims required. One you will specify this is a re-submission (only editing),
the other this is not a re-submission (deleted and re-entered).
To transmit
the data to host computer select;
V. Transmission
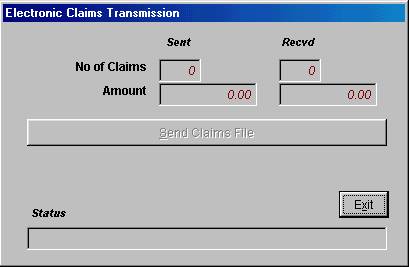
Figure
F.3
From the
On-line processing menu. By selecting this option the system will now prepare
the data for transmission and tell you that “This procedure will transmit data
which has been selected for transmission. It is recommended that an edit list
report be printed before transmitting data and any errors found be corrected.
Do you which to continue with this transmission?” Answer yes or No
accordingly. If you answer Yes a window will pop up telling you how many claims
you are going to send and the amount, to proceed with sending these claims
click on “Send claims File” and your claims will be sent, this window will stay
open and you can view the status at any time during transmissions to the host
computer. , if you do not want to send the claims do not click on Send claims
file, just click on Exit.
When the
system has completed transmission you will get an On-screen acknowledgement
that the host has received your claims. If there is a phone line interruption
and the transmission does not come through, then you simply need to tell the
system do "Transmission”(click on this button again) and the system will
attempt again.
Once your
transmission has been completely sent the next step is to print out the "Transmission exception report". After the claims have been sent the
system will prompt you with a question asking you if you want to print out this
report answer yes or No accordingly. This report is further explained below.
Transmission
Exception Report
This report
will give you a list of claims that were rejected by the host computer for
invalid information. This report will assure that you do not transmit any
claims with incorrect information. If you failed to fix a claim that had an
error message it will appear on this report. If no report appears, that means
that there are no rejections for the previous transmission.
Key Notes;
1. Make sure
that you computer modem is turned on prior to attempting to transmit claims.
2. Always
correct any claims that have error messages prior to transmitting. Follow the
correct procedures to do this as explained in this section of the manual.
3. After you
transmit always print the post-transmission reports
A-
Transmission Exception report
B- Print any
received documents
4. If there
are any rejections in your "Transmission exception report" make sure
to correct them and re-transmit those claims.
5. If you have
claims that were not selected, refer to the Reasons Why an Insurance Claim will
not print section of this manual. Be aware that therein it is instructed to
look at the set up of the insurance company code for the patient, and if it
says for on-line transmission, 'Y', it needs to be changed to 'N', or the form
to print. However, since in this case you are selecting for filing
electronically, the answer therein, in order for the system to properly select
the claim, should be 'Y'.
Follow these
guidelines and you will find that Electronic transmission can be of great
benefit and a time saver, to your practice.
VI. Electronic Remittance Notice Process
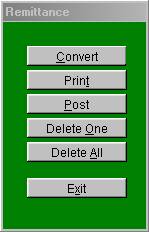
Figure
F.4
This section
is used to process the automatic remittance payments from your insurance
companies. This function will allow you to receive your payments, from those
companies that you transmit claims electronically to, and provide for the
capability through an electronic file. Lets go over how to process your
remittance payments.
Note: Prior to
begin using the remittance system, you must make sure that you are transmitting
electronically the transaction sequence numbers as the reference, rather than
patient ID numbers. Refer to the section of the manual titled "SYSTEM
MANAGEMENT" for instructions on how to set this function. Also please be
advised that the proper authorization from the insurance companies, and Budget
Computer Systems is necessary prior to implementing this function in your
system. Please contact Budget Computer Systems for further instructions.
The automatic
remittance electronic payments can be requested by simply transmitting
electronic claims. If the system detects that you have pending files here to
be processed it will automatically send them to your system. If you wish to
request the file but do not have any claims to transmit, then you can transmit
a file with zero claims. Once you have received your remittance file you must
proceed with the following steps.
First click on
the button that reads “Remittance “ from the main menu of the program in the
Online Process file. Then you will have the following steps:
1. Convert
(remittance data)
This function
will take your electronic remittance file, and convert them to a standard file
layout that your program can read. To execute this function just select
"Convert remittance data" from the Remittance processing menu. The
system will now proceed to convert the file.
Once the file
has been converted the next step is the following;
2. Print
(remittance summary report)
This function
will give you a report of the file that was just converted. This report will
give you a listing of all the payments that where received. This report will
be as detailed as your E.O.B. from the insurance company. This report should
be reviewed in detail before going on. It is very important that you verify
all the amounts approved and paid for their accuracy. Please note that this
report will also include rejections, and denials. If you select to have the
system post this payment file, any claims that were denied, the system will
automatically write off the entire amount. Therefore if you do not want to
have the system write off denied claims, you must remove them from this report
prior to processing the automatic payment posting. To delete any posting entry
from the remittance posting menu select "Delete One” The system will then
ask you the following;
Enter the
record number to delete
Enter the
record number associated to the entry that you wish to delete. The record
number can be found on the left hand side of the report.
Once the file
has been edited the next step is to post the remittance file to the systems
main files. To execute this function, select from the Remittance processing
menu the following;
3. Post Data to
Main Files
Once you have
reviewed, revised, and/or made any necessary changes to your remittance file,
select this function. The system will ask you some questions as which to guide
it on how you wish to handle the automatic posting of your remittances. Please
refer to figure 7-4 for an example of this posting selection screen. Lets go
over the following questions on that screen.
Enter Posting
Date
Enter the date
that you want this payment to be posted in your system. The date here should
be the same as the date that you are depositing the payment, for purposes of
balancing your entries.
Creating
Disallowance Adjustments
By answering "Y" to this field the system will automatically create a disallowance
adjustment for all the payment entries in your remittance file. The
disallowance amount that the computer will post is based on the difference
between the amount billed, and the amount approved.
Create GRH
Adjustment
Enter here "Y" if you want the system to automatically create a Gramm-Rudman
disallowance for any payment entry that one has been applied to. Gramm-Rudman
is percentage of the amount paid that Medicare deducts, per a law passed by the
government, with the intent of balancing the budget. Please refer to your
Medicare manuals for more details on this law. Answer "Y" to have
the system automatically create the adjustments, otherwise enter "N".
Post allowed
amounts to Procedure
If you wish to
have the system automatically update the allowed amounts in your procedure file
based on the remittance payment, then answer "Y" here, otherwise
answer "N". By answering "Y" the system will merely update
your procedure files with the current allowed amounts, base on your remittance
payment file.
Then the
system will prompt you with the "DONE" prompt. Answer "Y"
to have the system begin automatically posting your payments, and adjustments
as per your request. The system will then proceed to post all transactions to
your patient files. This payments and adjustments will appear on your patient
files exactly like if they had been posted manually. They will also appear on
your daily reports.
The "Automatic Remittance Posting" is a time saving and efficient feature
of the program. What may take, by manually entering, hours to process, the
system could process in a matter of minutes. It will also be more accurate,
taking into consideration that having the system automatically create the
transaction entries eliminates human error. For more details and
specifications on how to join the remittance program, contact Budget Computer
Systems, Software Support Department.
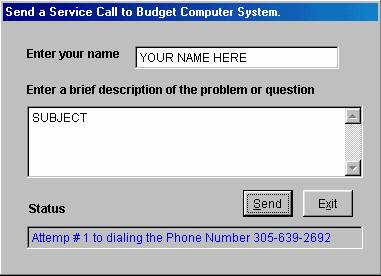
Figure F.5
VII. Send Service Call
To
access this function click on the button that reads “Service Call” in the
Online Processing column of the program. Once you click on this a window will
pop up requesting you to enter you name, or the name of the person Budget
Computers should call back. If you logged in by using your operator name/code
that name will appear here automatically. The next field asks you to “Enter a
brief description for the problem or question” Enter the information desired
here. Once you have finished entering this Click on the button on this window
that reads “Send”, your service call is now being sent to Budget Computer
System, if you do not want to proceed click Exit.
VIII. Setup
This section
of the package is where it is specified to the system the communication
parameters it is to use. Those offices transmitting Medicare claims
electronically, such that the system knows the number to call, the login
information for the user, etc..., hereby use the information. The information
requested by this section of the package will be entered or provided by Budget
Computer Systems, Inc.
SUMMARY
We have now
completed covering the "Insurance Claim Processing" section of the
manual. You will find the functions in this section of the package very
helpful in the quick submission of claims, and as tools with which to
effectively collect from the insurance companies. This section will also
decrease the amount of errors that are made when doing manual insurance claims,
due to the fact that the system will be printing the claims, and also when
submitting electronic claims the system will look for any mistakes during entry
for which Medicare will automatically discard a claim.
 I. Select Services for Electronic
Transmission
I. Select Services for Electronic
Transmission